Questions
You have questions, don't worry we're here for you. From tech stuff to how we support our community, below you'll find questions and answers to help you.
If you don't find the answer you're looking for check out our Help and Support Knowledgebase. Or get in touch, We'd love to hear from you.
Open the app, and you will find yourself on the front page. From here you can create a test stream by selecting the plus icon on the top right corner. On the page, click on the green bar to set up a test stream.
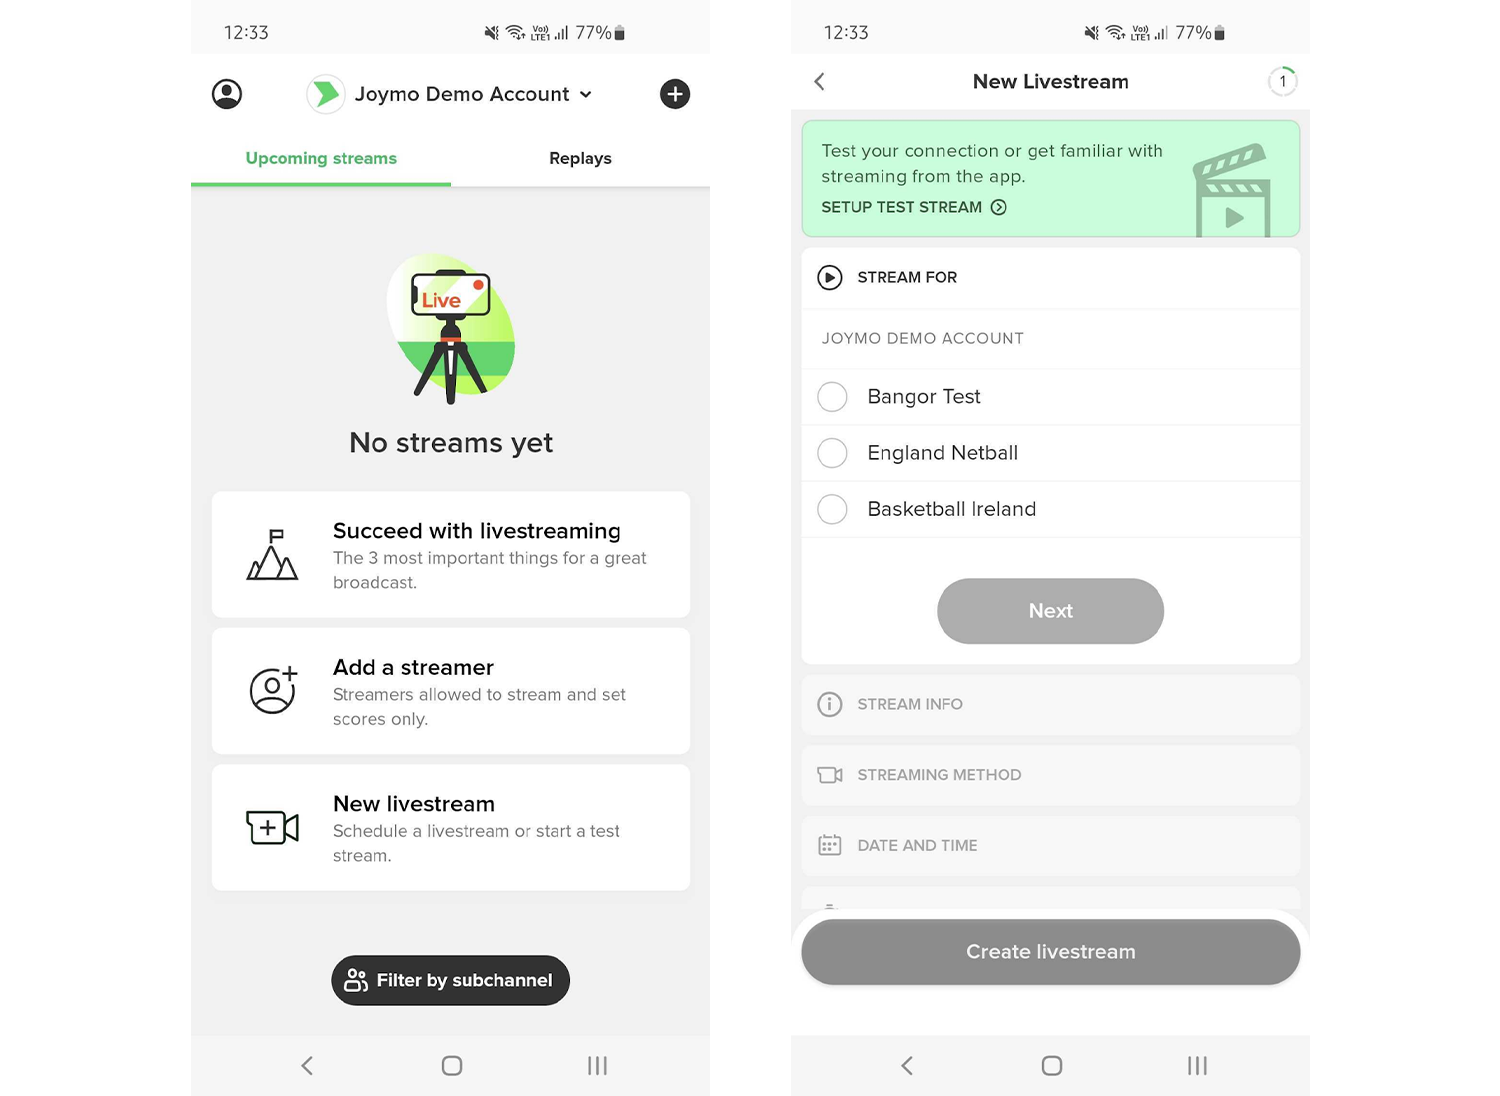
On the test stream page, complete all the steps to schedule your test
Stream For: Select the channel that you are scheduling a stream for. You will only see more than one channel if you are administering several channels.
Stream Info: For a test, this can be left with default text.
Streaming Method: Select if you are doing the test with Joymo Share (the app) or Joymo Connect (your own camera equipment and RTMP protocol)
Date and Time: Set the start time and date for your test.
Duration: Set the duration of the test. We recommend a longer test.
Stream Lifetime: If you want to rewatch the test on arena.jomoy.no, please set the stream life time to Forever.
The app is tested and works very well on any flagship device (iOS/Android) from the last 3 years.
The app is working on the following OS:
Android 12.0 or later
iOS 15.0 or later
Recommended devices:
iOS - Apple iPhone 13 or later
Android - Samsung Galaxy s21, Google Pixel 7 or later
Note - For Android devices we recommend a device with a processor equivalent to a Qualcomm Snapdragon 888 and 8GB of RAM or greater.
No, the app is for scheduling, filming and managing the livestreams of your streaming channel.
Scheduling: You can schedule your own events and test streams directly through the app, both for using the app or an external camera as the streaming method.
Management: The app can also be used when managing your streams - you can edit scheduled events and end broadcasts when the event is over. If you need to extend the scheduled stream time, this can also be done in the app.
Filming: The app is also used for filming your event, delivered directly to the OTT channel.
Open the app, and you will find yourself on the front page. From here you can create a test stream by selecting the plus icon on the top right corner. On the page, click on the green bar to set up a test stream.

On the test stream page, complete all the steps to schedule your test
Stream For: Select the channel that you are scheduling a stream for. You will only see more than one channel if you are administering several channels.
Stream Info: For a test, this can be left with default text.
Streaming Method: Select if you are doing the test with Joymo Share (the app) or Joymo Connect (your own camera equipment and RTMP protocol)
Date and Time: Set the start time and date for your test.
Duration: Set the duration of the test. We recommend a longer test.
Stream Lifetime: If you want to rewatch the test on arena.jomoy.no, please set the stream life time to Forever.
When all steps are completed, you go ahead and press "Create Livestream". The livestream will now be visible in the Joymo Share app.
Open the app, and you will find yourself on the front page. From here you can create a test stream by selecting the plus icon on the top right corner. On the page, click on the green bar to set up a test stream.
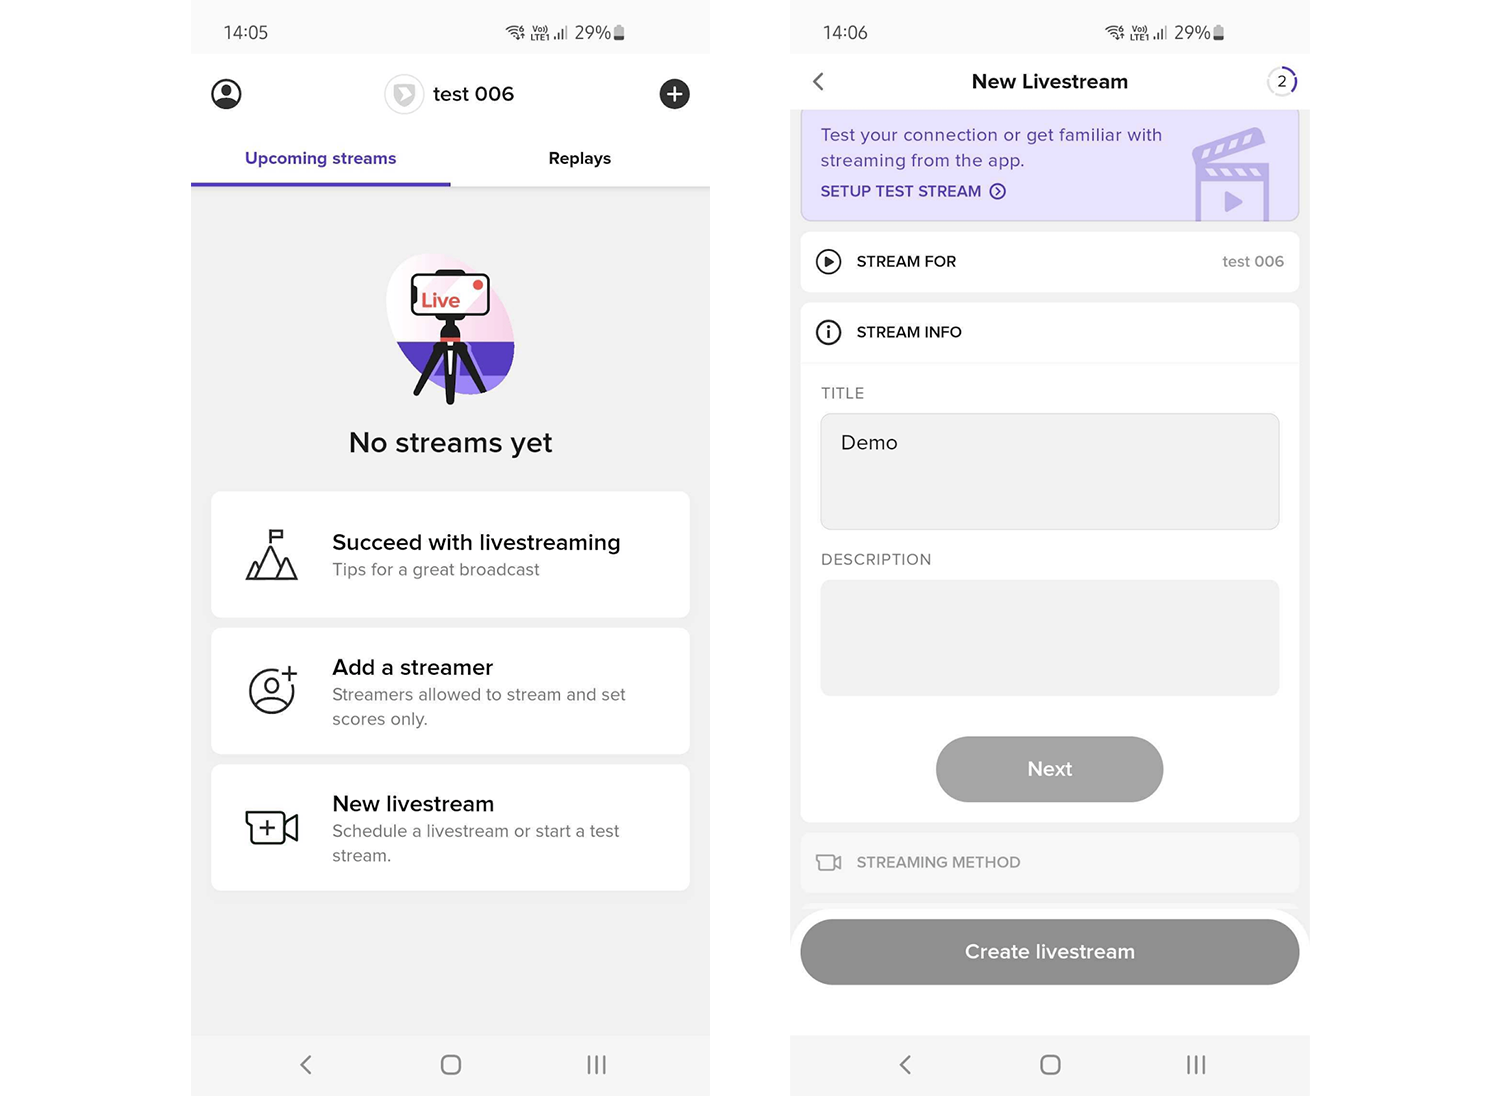
Stream For: Select the channel that you are scheduling a stream for. You will only see more than one channel if you are administering several channels.
Stream Info: For a test, this can be left with default text.
Streaming Method: Select if you are doing the test with USM Share (the app) External Camera (your own camera equipment and RTMP protocol)
Date and Time: Set the start time and date for your test.
Duration: Set the duration of the test. We recommend a longer test.
When all steps are completed, you go ahead and press "Create Livestream". The livestream will now be visible in the USM Share app.
When it is time to broadcast your event using the Joymo Share app, you open the app and select the event you are going to film.
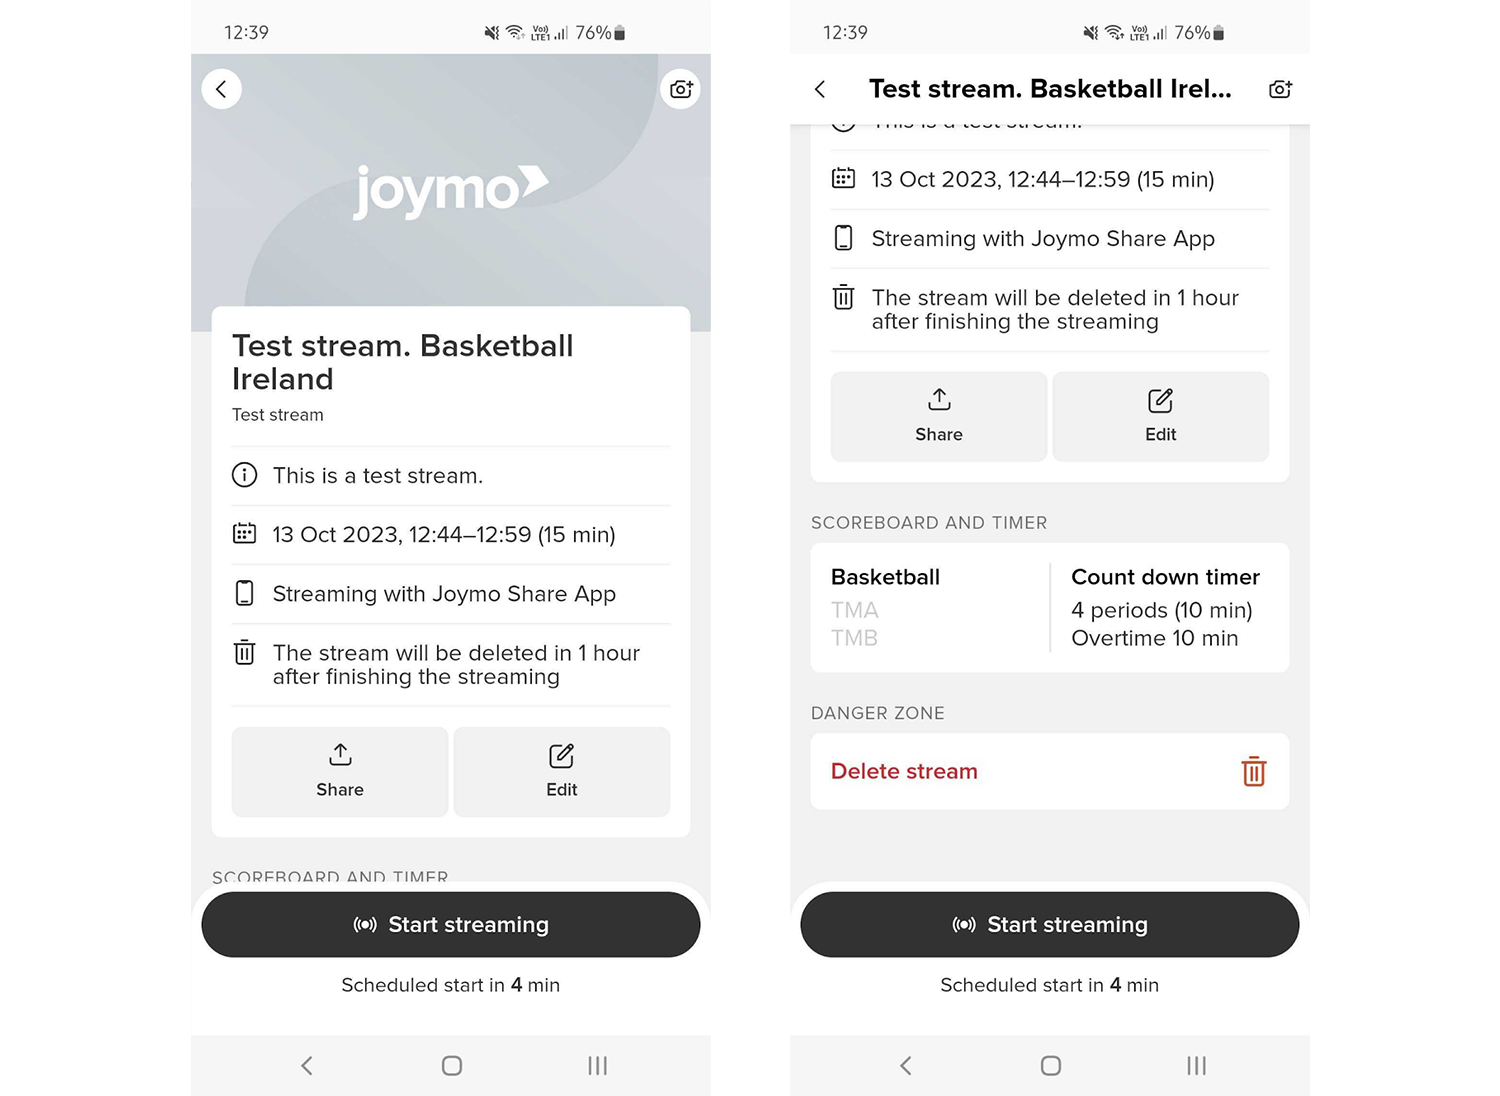
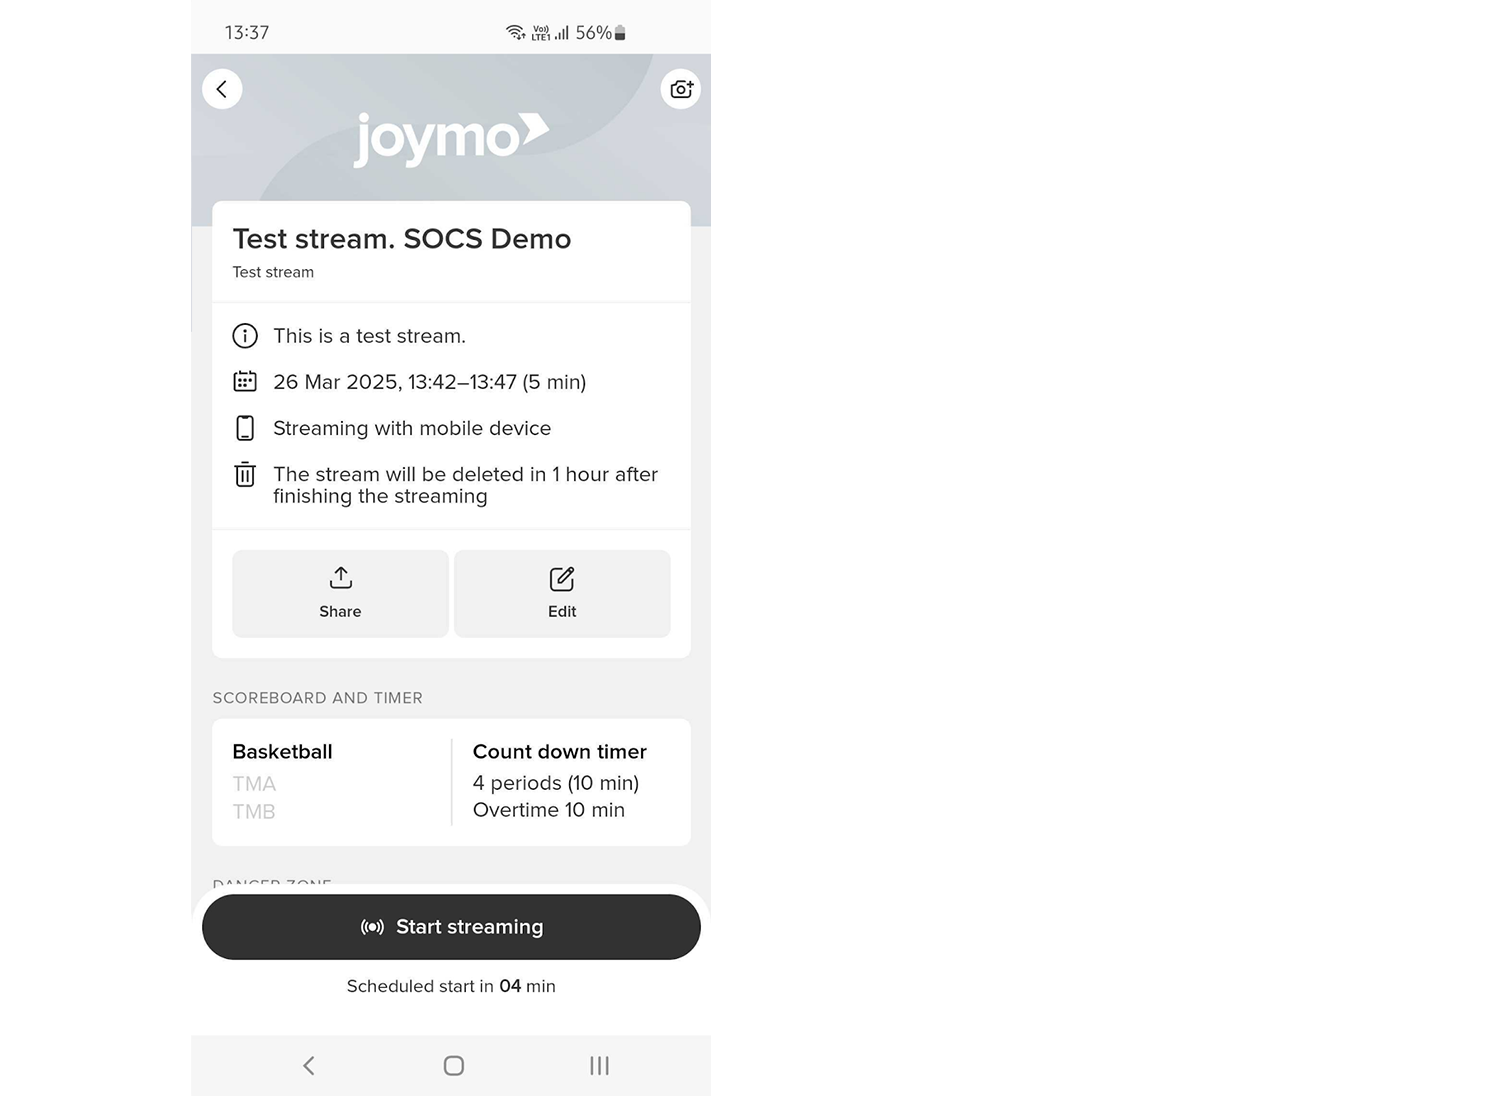
After selecting the event, the settings for the timer and scoreboard will become visible. You will also be able to share and edit your livestream, using the different buttons on the dashboard.
Scroll down on the page and you will see the section called Scoreboard and Timer. Entering this section will allow you to set up your scorekeeper settings.
Enable scoreboard and timer (if both are applicable for your sport).
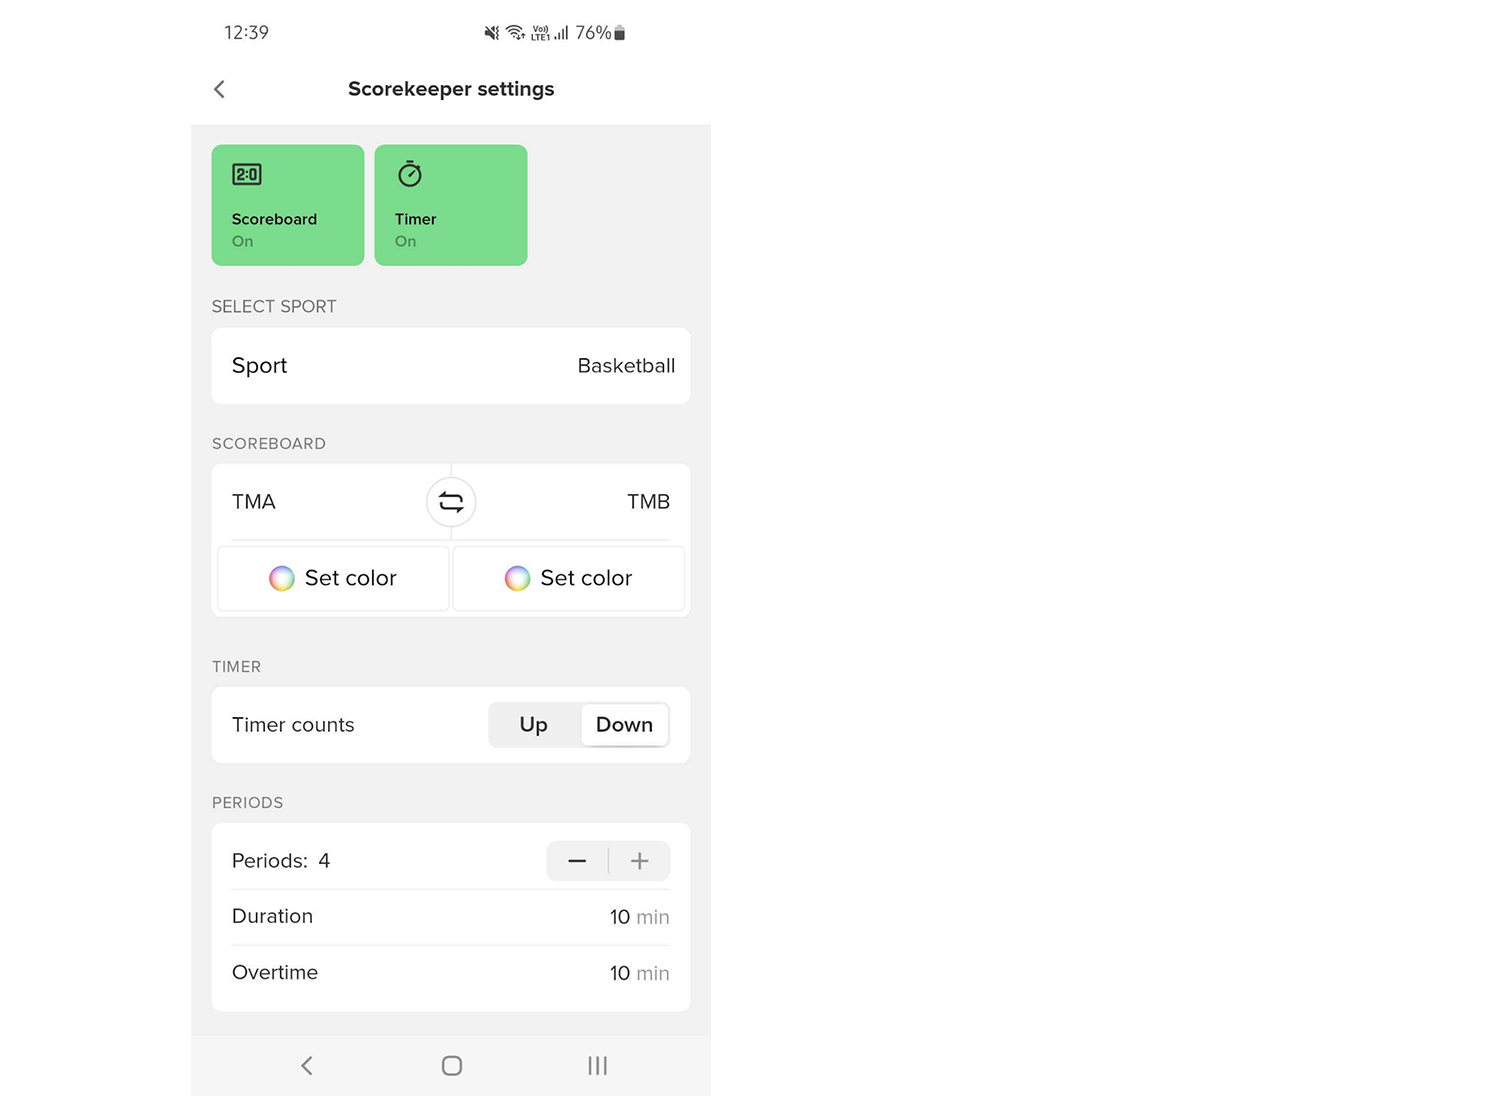
Once the steps are completed and you have set up the scoreboard, you go back to the front page and “Start Streaming”.
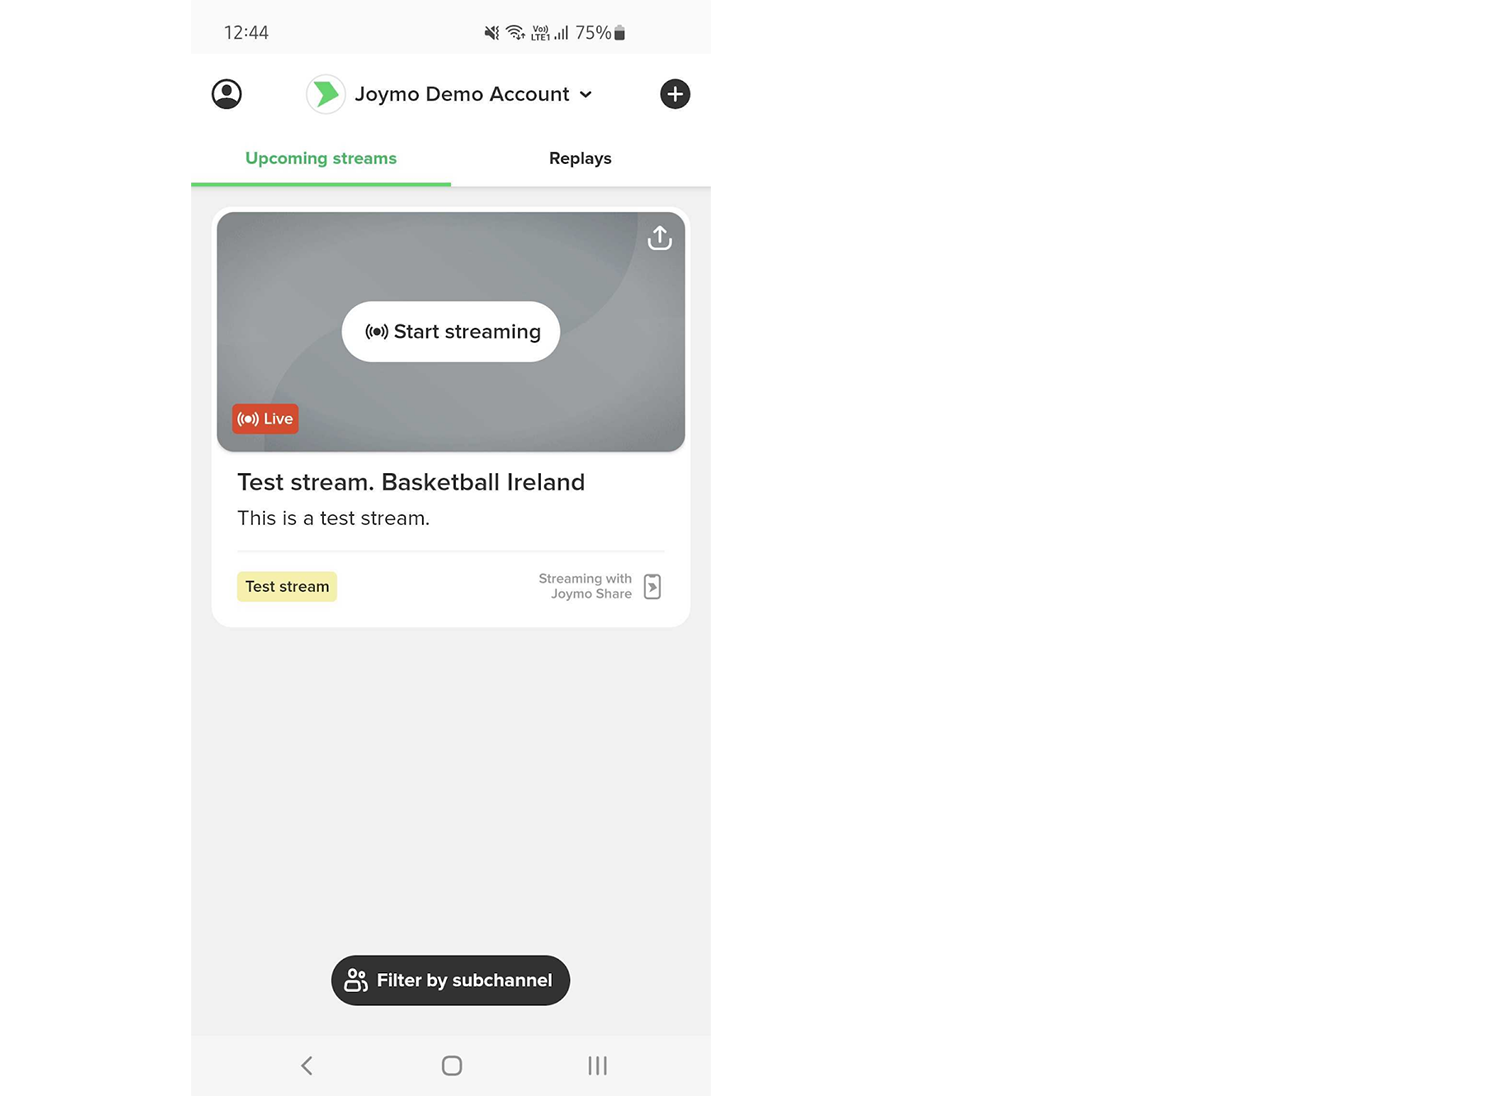
When it is time to broadcast your event using the USM Share app, you open the app and select the event you are going to film.
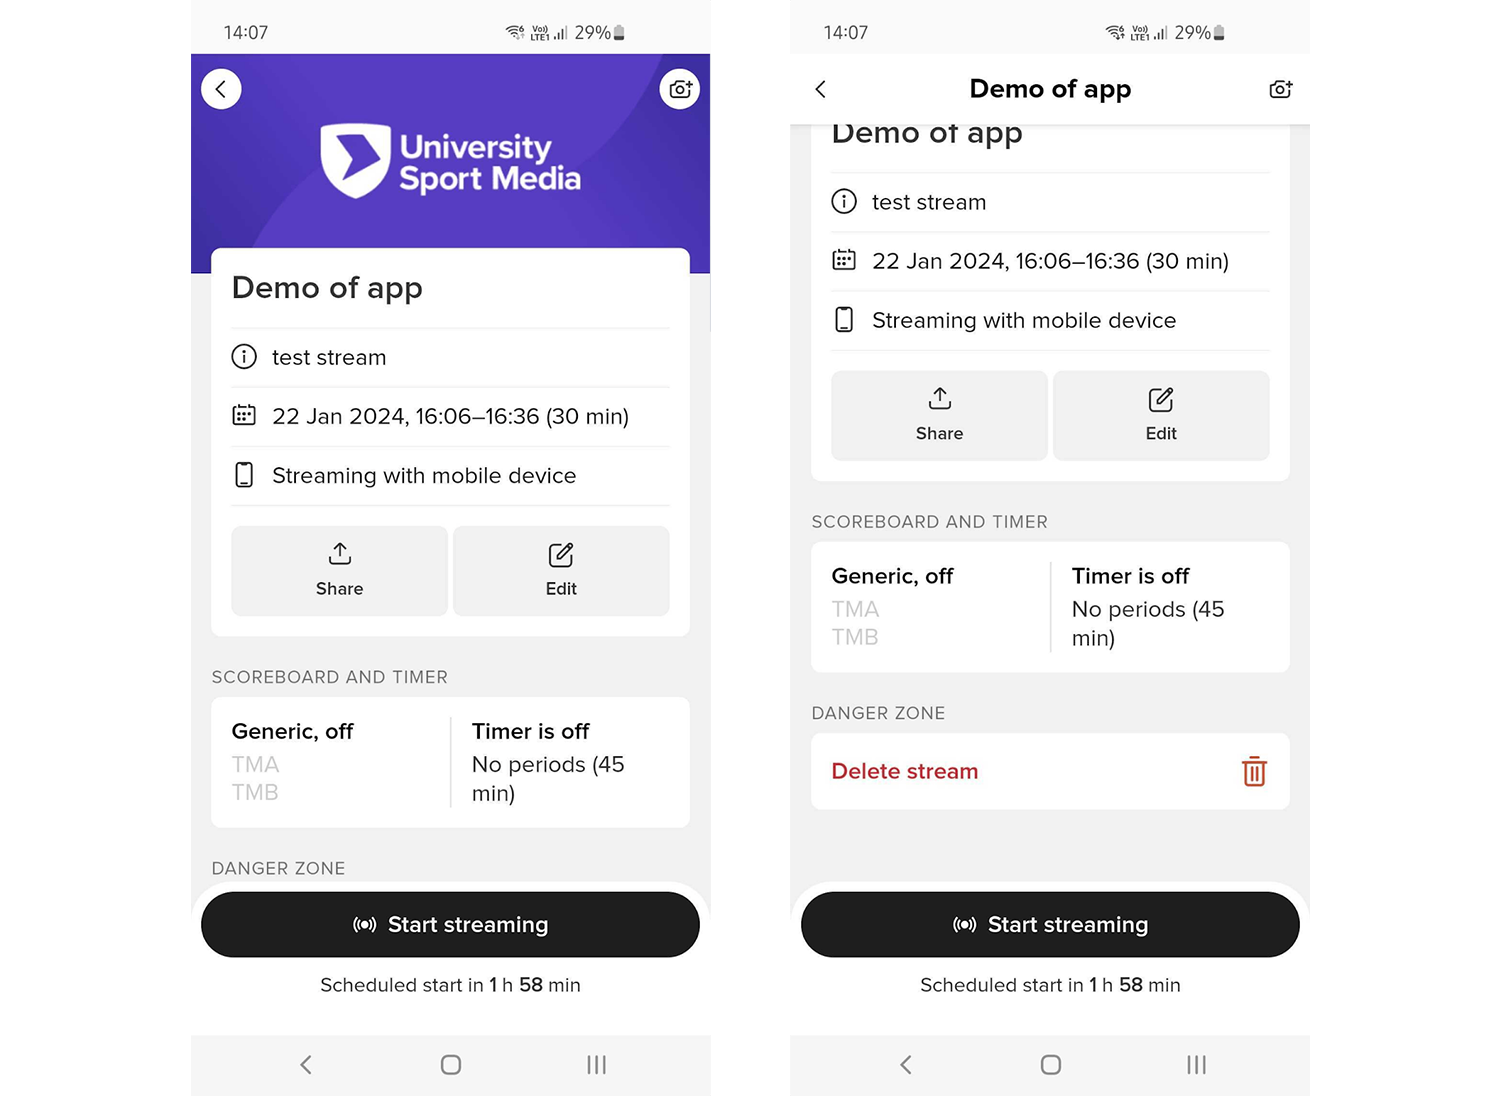
After selecting the event, the settings for the timer and scoreboard will become visible. You will also be able to share and edit your livestream, using the different buttons on the dashboard.
Scroll down on the page and you will see the section called Scoreboard and Timer. Entering this section will allow you to set up your scorekeeper settings.
Enable scoreboard and timer (if both are applicable for your sport).
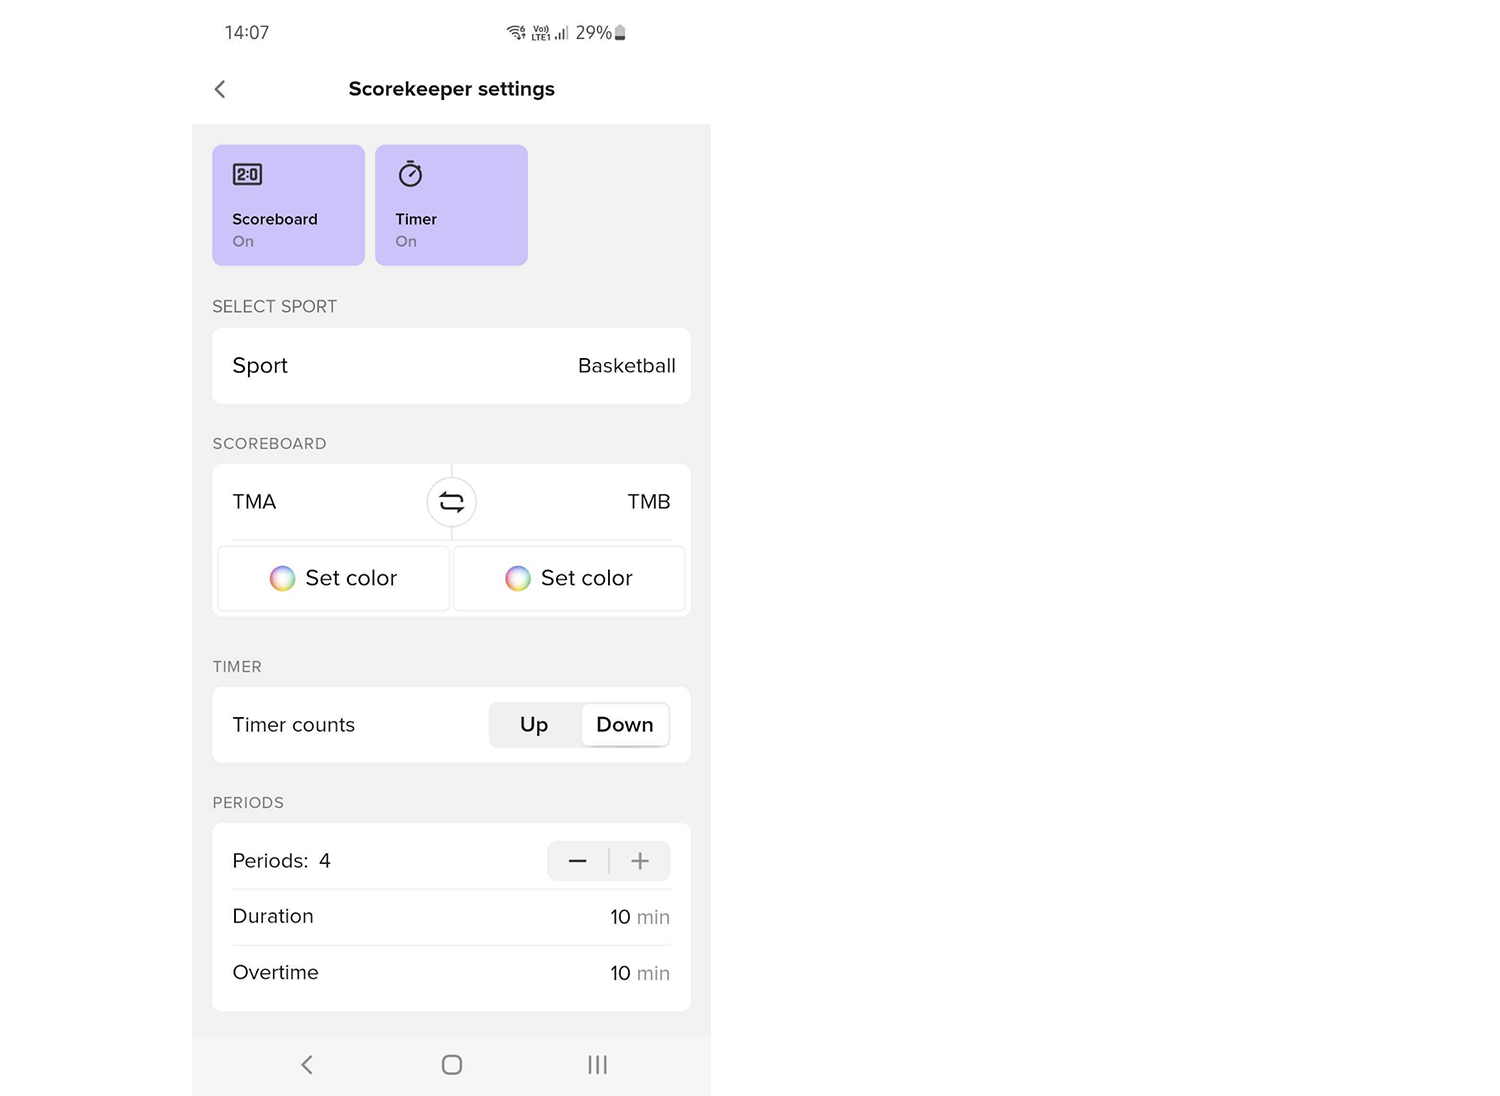
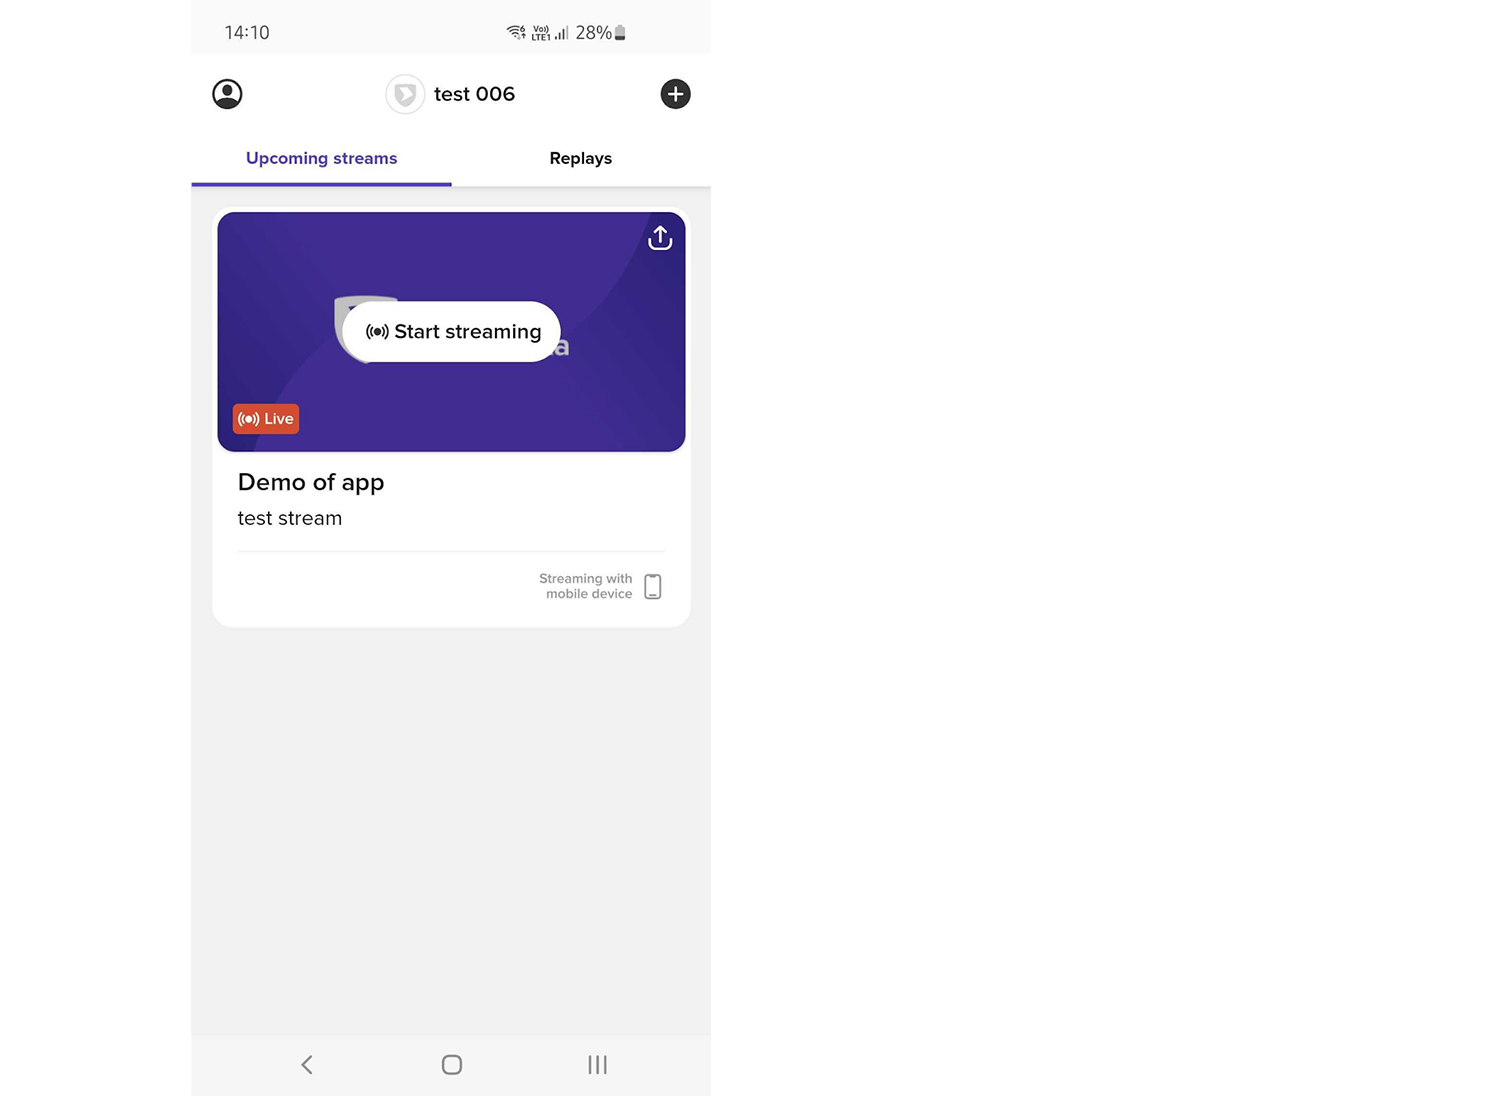
Once the steps are completed and you have set up the scoreboard, you go back to the front page and “Start Streaming”.
After entering the livestream, you will see this image. To start the filming, you have to press “Go live”.

From within the stream screen, you can also make changes to the scoreboard settings (or add scoreboard if this is not already visible).
You can also change the team names in the settings tab. Please note that the team names will always carry over from the previous broadcast. These must be changed ahead of the new event.

In the settings section, you can also End or Extend a broadcast.

After entering the livestream, you will see this image. To start the filming, you have to press “Go live”.

From within the stream screen, you can also make changes to the scoreboard settings (or add scoreboard if this is not already visible).
You can also change the team names in the settings tab. Please note that the team names will always carry over from the previous broadcast. These must be changed ahead of the new event.
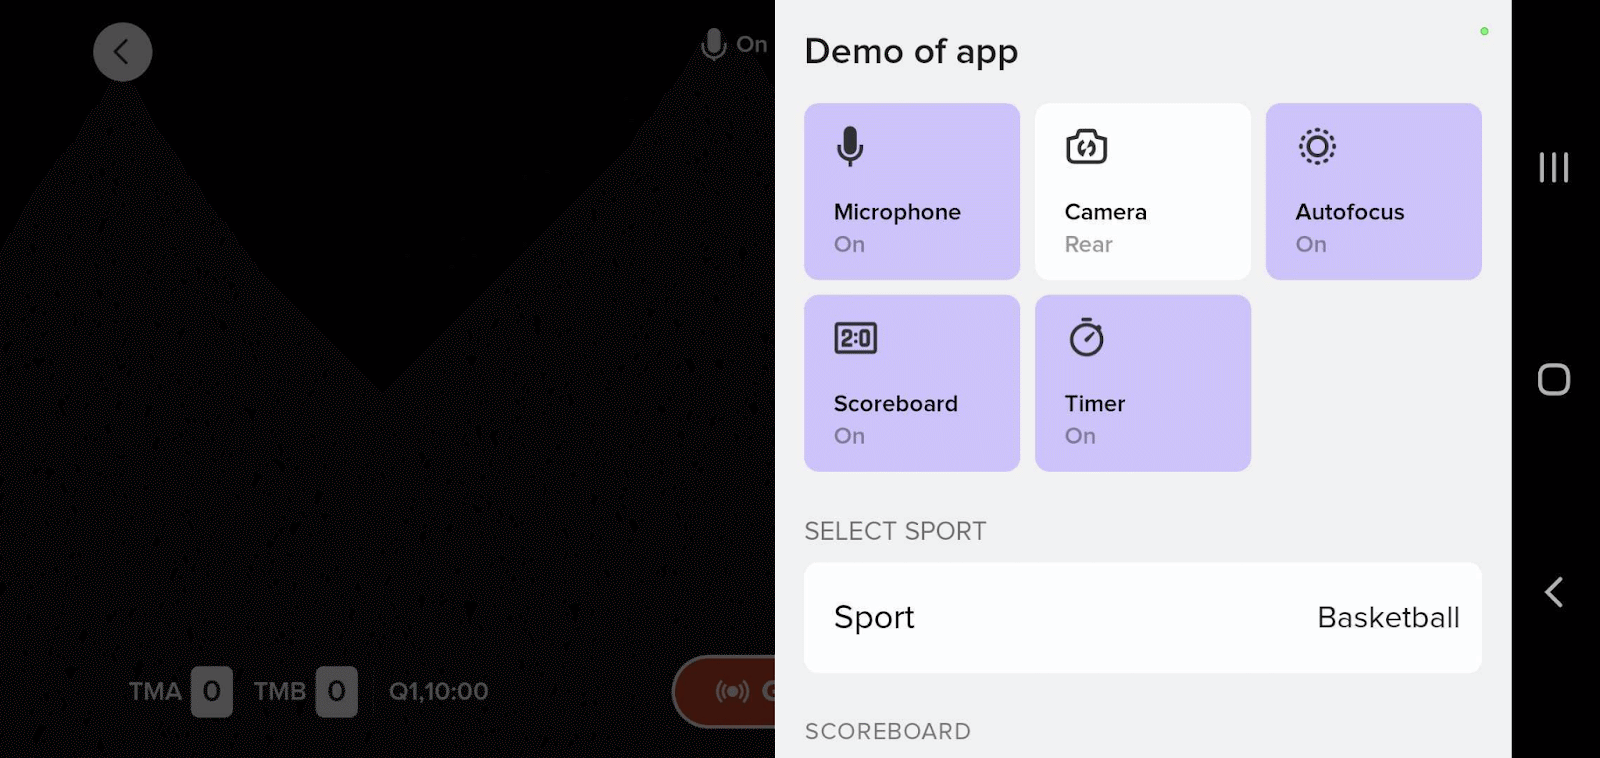
In the settings section, you can also End or Extend a broadcast.
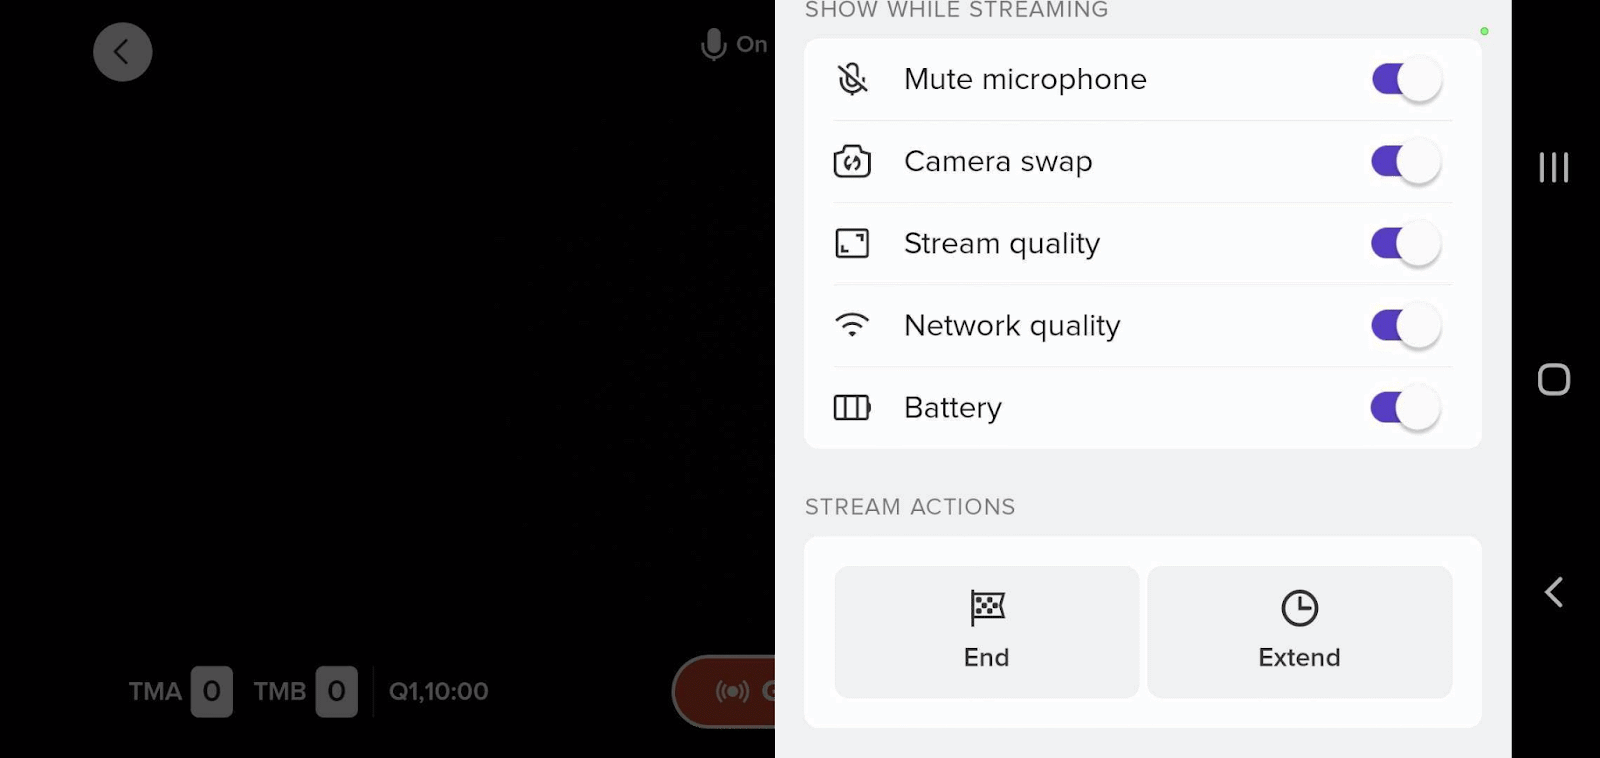
When the stream is in “Live” state, you can click on the scoreboard in the lower left corner to activate the scoring view. The below is an example of a basketball scoreboard, where the person filming has the option to select the correct Quarter, start the timer (clock) and add points to either team.

If the start date and/or time of the event you are going to stream has changed, you can easily edit the time of the broadcast in the app. Select the event you want to edit, and click “Edit”. Make the necessary changes and save.
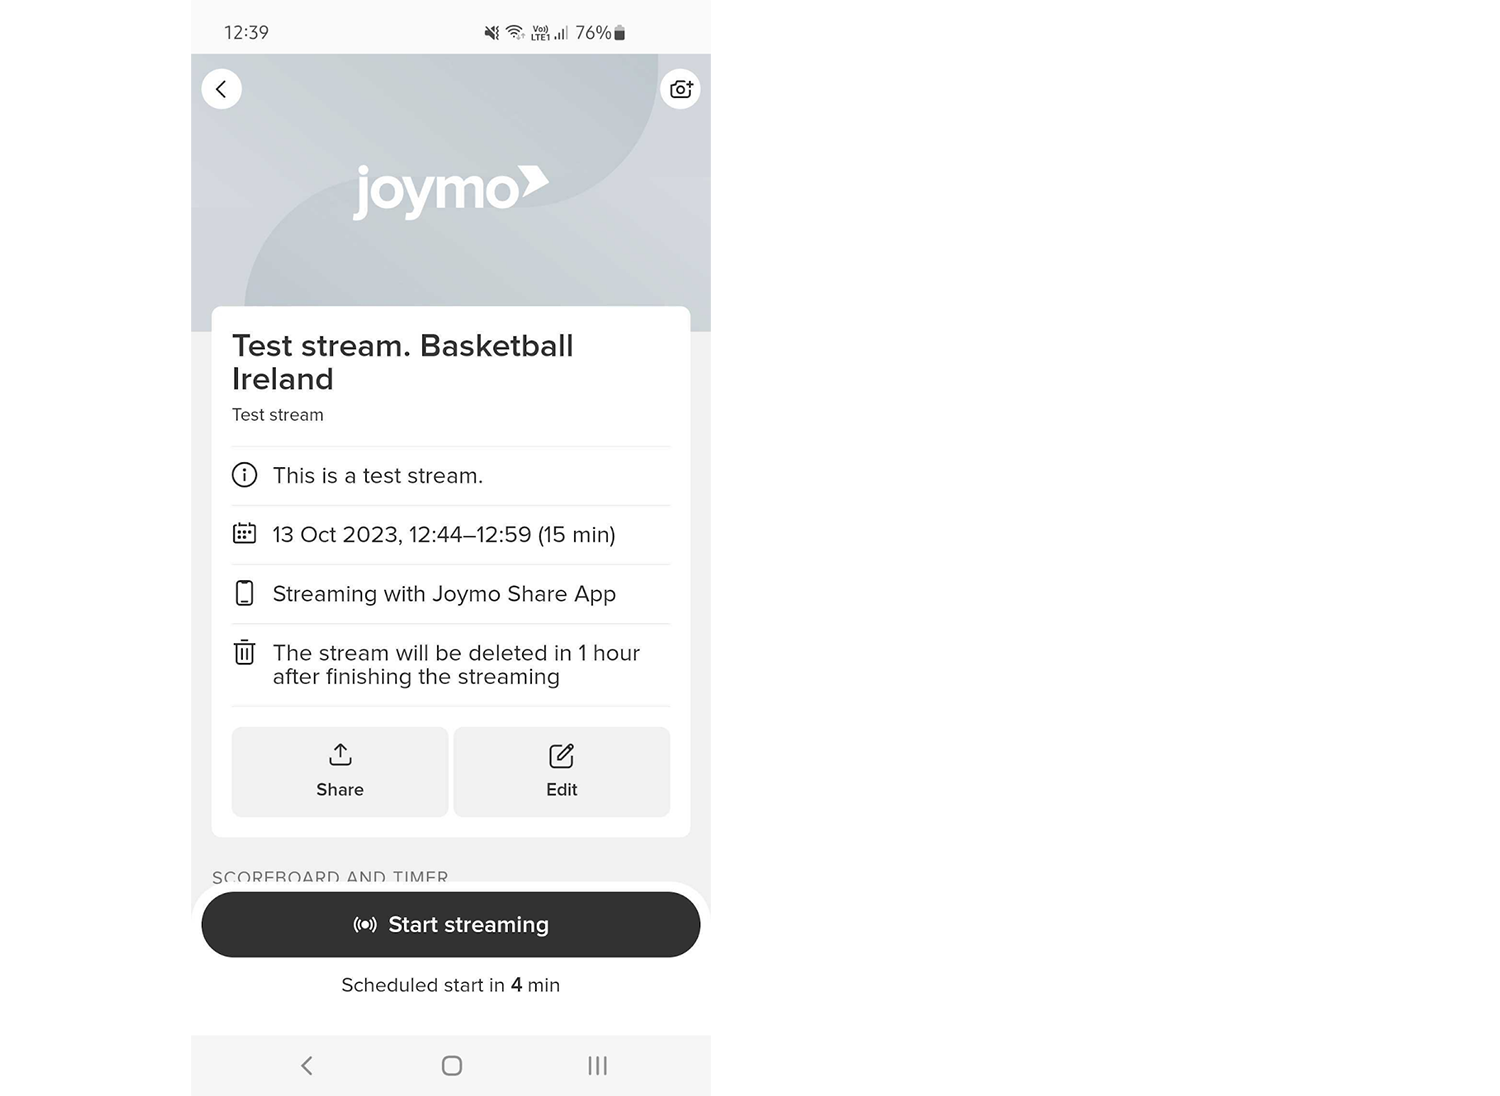
If the start date and/or time of the event you are going to stream has changed, you can easily edit the time of the broadcast in the app. Select the event you want to edit, and click “Edit”. Make the necessary changes and save.
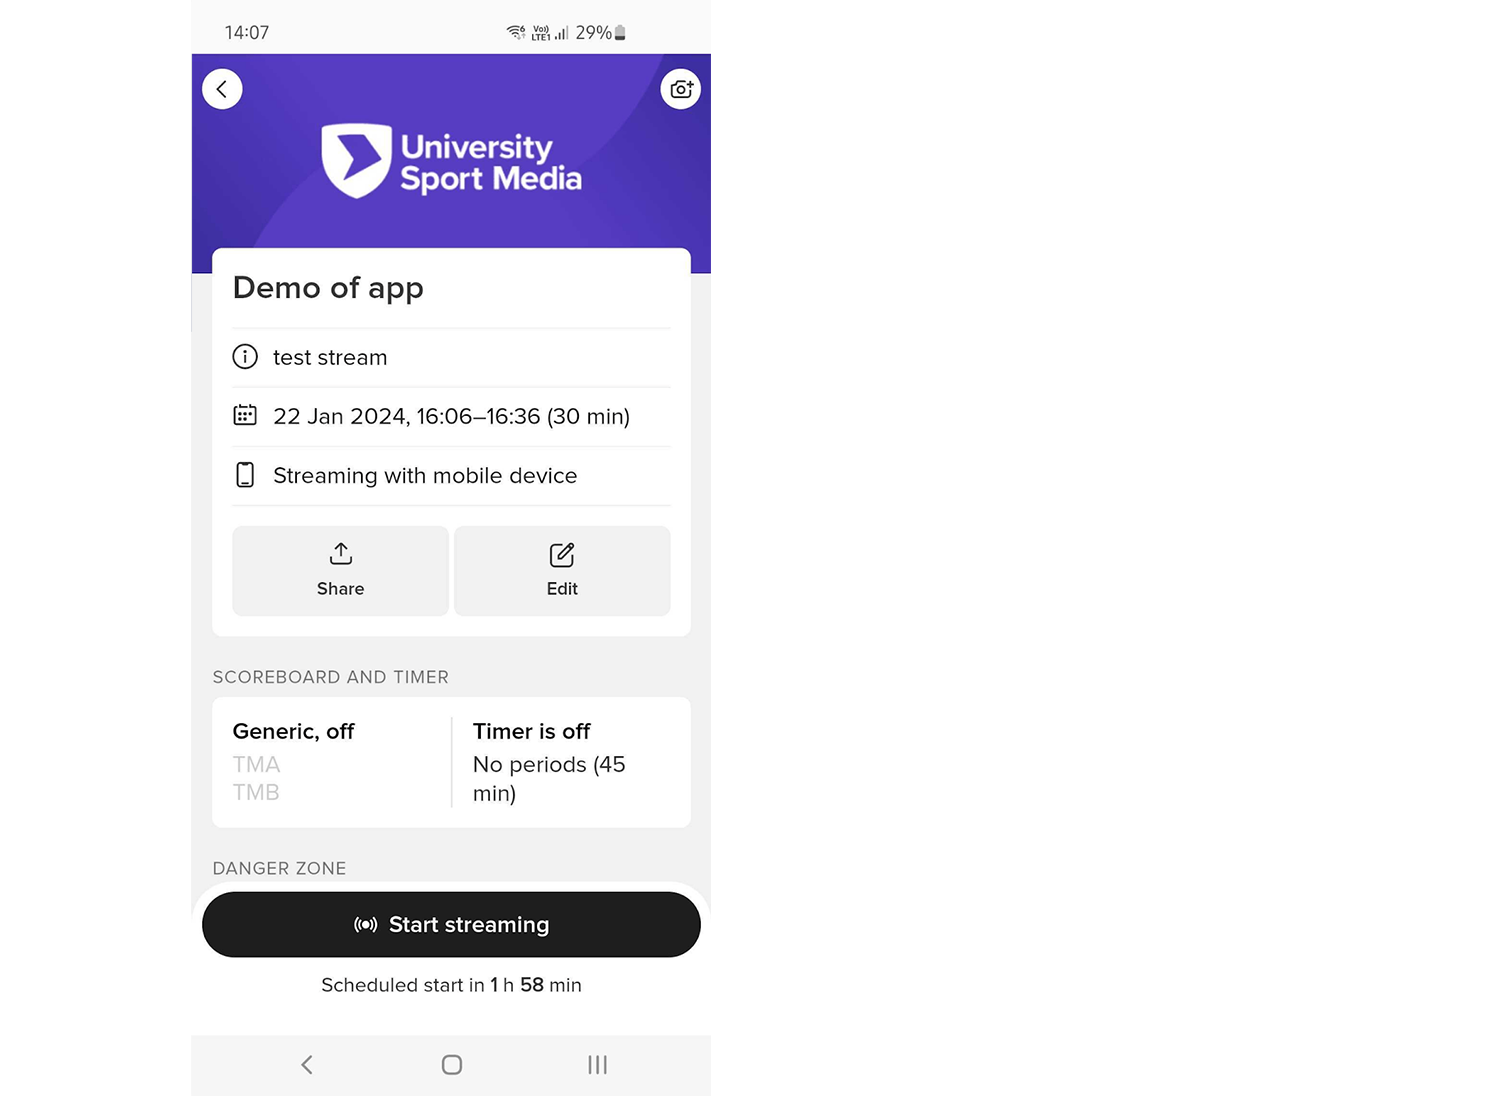
In the event that you notice that your scheduled stream time will not be enough to capture the whole event that you are filming, you have the option to extend the broadcast in the app.
To do so, go to the settings icon in the stream view (top right corner)
Select "Extend" all the way at the bottom of the menu. Add the appropriate amount of minutes.

If you experience glitches and jumps in the broadcast that are not related to an unstable internet connection, you can try to turn off the autofocus function in the app.
You can have a second user to assist with keeping the score and to manage the timer using a secondary device when broadcasting through the USM Share app.
The first user to access the event in the app will be the one having permission to manage the filming of the event.
Any other user (who is connected to the team account) who accesses the same event as User 2, will be able to join as a to scorekeeper.
The scorekeeper will not see the live feed, but will manage the timer and scoreboard on behalf of the user filming.
Should the user doing the filming lose access to the stream (in the event the device runs out of power, as an example), user 2 will have the option to take full control and to resume the filming.

Video settings
Protocol: RTMP
Resolution: 1920x1080p. Alternatively, 1280x720p or 854x480p are supported.
Frame rate: Constant 30fps. VFR is supported but not recommended.
Scan type: Progressive. Interlaced scan is not supported and will cause artifacts in the output.
Bitrate: Depending on the resolution the following bitrates are supported
1920x1080 (1080p): 3,000 - 9,000 Kbps
1280x720 (720p): 1,500 - 4,000 Kbps
854 x 480 (480p) 500 - 2,000 Kbps
Bitrate type: Constant bitrate (CBR) is recommended over Variable bitrate (VBR).
Video Codec: H.264 level 4.1 or higher
Keyframe Frequency: 2 seconds
Audio Settings
Codec: AAC
Bitrate: 128 Kbps
- For timeout and connection issues, make sure the RTMP/ Server URL is entered correctly, without any typos.
- If you’re unable to watch your event, make sure the “Stream Name or Key” is entered correctly, without any typos. If there are typos, your camera device or software will only connect to Joymo, but will not broadcast the event.
- Some cameras/ software require the stream key to be in the same RTMP URL. In such cases, try appending the “Stream Name or Key” to the “RTMP/ Server URL”.
- For example, if the “RTMP/ Server URL” you received is “rtmp://10.10.10.101:1935/jdp/” and the “Stream key” is “xyxy-test”, then the new RTMP URL would be “rtmp://10.10.10.101:1935/jdp/xyxy-tes
Schedule your event in the app or on arena.joymo.no
Retrieving the RTMP URL and stream key
- 1 hour before the scheduled stream start you will receive an e-mail containing the RTMP URL and stream key.
- You can also retrieve these details 1 hour before the scheduled stream start from the Joymo Share app or arena.joymo.no/manage/streams and viewing the events ‘Settings’
You can now enter the RTMP URL and stream key into OBS Studio (as example) and configure the stream settings.
Connect your camera to the computer running OBS studio, this will typically require an HDMI, s-video or USB capture card but can differ from camera to camera, consult the camera manual for further details.
The URL will go active and you can start streaming at the scheduled start time of your event.
Schedule your event in the app or on arena.joymo.no
- Retrieving the RTMP URL and stream key:
1 hour before the scheduled stream start you will receive an e-mail containing the RTMP URL and stream key.
You can also retrieve these details 1 hour before the scheduled stream start from the Joymo Share app or arena.joymo.no/manage/streams and viewing the events ‘Settings’
You can now enter the RTMP URL and stream key into the encoder and configure the stream settings (Follow the manual for your specific encoder for this step).
Connect your camera(s) to the encoder, this will typically require an HDMI connection, consult the camera manual for further details.
The URL will go active and you can start streaming at the scheduled start time of your event.
Make sure you prepare well in advance and set up tests with the equipment you will be using.
Do the tests at the same venue you will be livestreaming from.
If you are on 4G/5G or WiFi - make sure you test at the same position you will be filming from as the signal may vary in different places in the venue.
You can also do a speedtest from the position you will be filming.
You can stream on 4G, 5G and WiFi. Connecting to WiFi is preferred, but a good 4G/5G connection also works well. In that case - make sure your mobile contract has unlimited data. Take a look at these tips if your stream-tests or speedtest shows insufficient upload speed.
Portable wireless routers. Several operators sell portable wireless routers that transform your 4G/5G to a strong WiFi. An example to consider is the GigaCube from Vodafone (better ratings on the 5G version than the 4G).
Router Placement. Try to optimize the placement of the router and move it closer to the spot you are streaming from if possible.
WiFi Extender. A WiFi extender is used to extend the coverage area of your WiFi network. There are a lot of options to choose from when it comes to hardware. Look at reviews to make a solid decision. It is recommended that you use an extender that you can cable as only repeating the WiFi signal has various success rates.
Set a priority device. It is possible to set the device you are using as a priority device. Take a look at your router manuals on how you can configure and set that up.
Mesh Network. You can also look into setting up a Mesh Network. A mesh network is a group of devices that act as a single Wi-Fi network.
Updates and equipment. Remember to keep your router updated with the latest firmware. If you are experiencing less upload speed and reach than expected or needed you should look into acquiring new/better equipment/router.
Nothing is better than connecting directly with a cable. That will guarantee a stable stream and let you focus on a great production.
If you are using the Joymo Share app and a phone/tablet, but the WiFi in the venue is not strong enough you can consider cabling your phone with an adapter and ethernet cable. This also ensures that you have power during the streaming. Here is an example of an adapter you can consider buying.
If you are using a mixing software on your computer it is recommended that you connect your computer to ethernet.
Nothing is better than connecting directly with a cable. That will guarantee a stable stream and let you focus on a great production.
If you are using the USM Share app and a phone/tablet, but the WiFi in the venue is not strong enough you can consider cabling your phone with an adapter and ethernet cable. This also ensures that you have power during the streaming. Here is an example of an adapter you can consider buying.
If you are using a mixing software on your computer it is recommended that you connect your computer to ethernet.
An upload speed of 10 Mb/s and upwards is recommended to ensure a high quality livestream This gives you a buffer to account for fluctuations in upload speed.
If you are using the Joymo Share App and setting up simultaneous streams you need to multiply the listed requirements by the number of streams you are doing at the same time, meaning if you are streaming for example two courts at the same time at 720p you need a minimum stable upload speed of 20 Mb/s.
An upload speed of 10 Mb/s and upwards is recommended to ensure a high quality livestream This gives you a buffer to account for fluctuations in upload speed.
If you are using the USM Share App and setting up simultaneous streams you need to multiply the listed requirements by the number of streams you are doing at the same time, meaning if you are streaming for example two courts at the same time at 720p you need a minimum stable upload speed of 20 Mb/s.
Make sure you have enough power on your device for the duration of the stream. Close all other apps and enable do not disturb/stop notifications.
In order to ensure that streams are stable, 480p is the default resolution that is set before going live. Once a stream goes live, the content creator will see (on the screen) that the resolution will increase automatically based on the strength of the users internet connection up to 720p. If the internet connection is weak, the resolution remains at 480p.
Adaptive bitrate is automatically enabled, but you will have the opportunity to override that and manually choose the bitrate by going into settings in the app and disable adaptive bitrate.
The Wi-Fi symbol on the live screen mean the following:

If you are using mixing software like OBS or vMix you will have the option to adjust the bitrate and frames per second if you are experiencing bandwidth issues during streaming. Please take a look at the support services of your provider. You will find more information on that for OBS here and vMix here.
Schedule your event in the app.
Retrieving the RTMP URL and stream key
1 hour before the scheduled stream start you will receive an e-mail containing the RTMP URL and stream key.
You can also retrieve these details 1 hour before the scheduled stream start from the USM Share app.
You can now enter the RTMP URL and stream key into OBS Studio (as example) and configure the stream settings.
Connect your camera to the computer running OBS studio, this will typically require an HDMI, s-video or USB capture card but can differ from camera to camera, consult the camera manual for further details.
The URL will go active and you can start streaming at the scheduled start time of your event.
Open the app, and you will find yourself on the front page. From here you can create a test stream by selecting the plus icon on the top right corner. On the page, click on the green bar to set up a test stream.
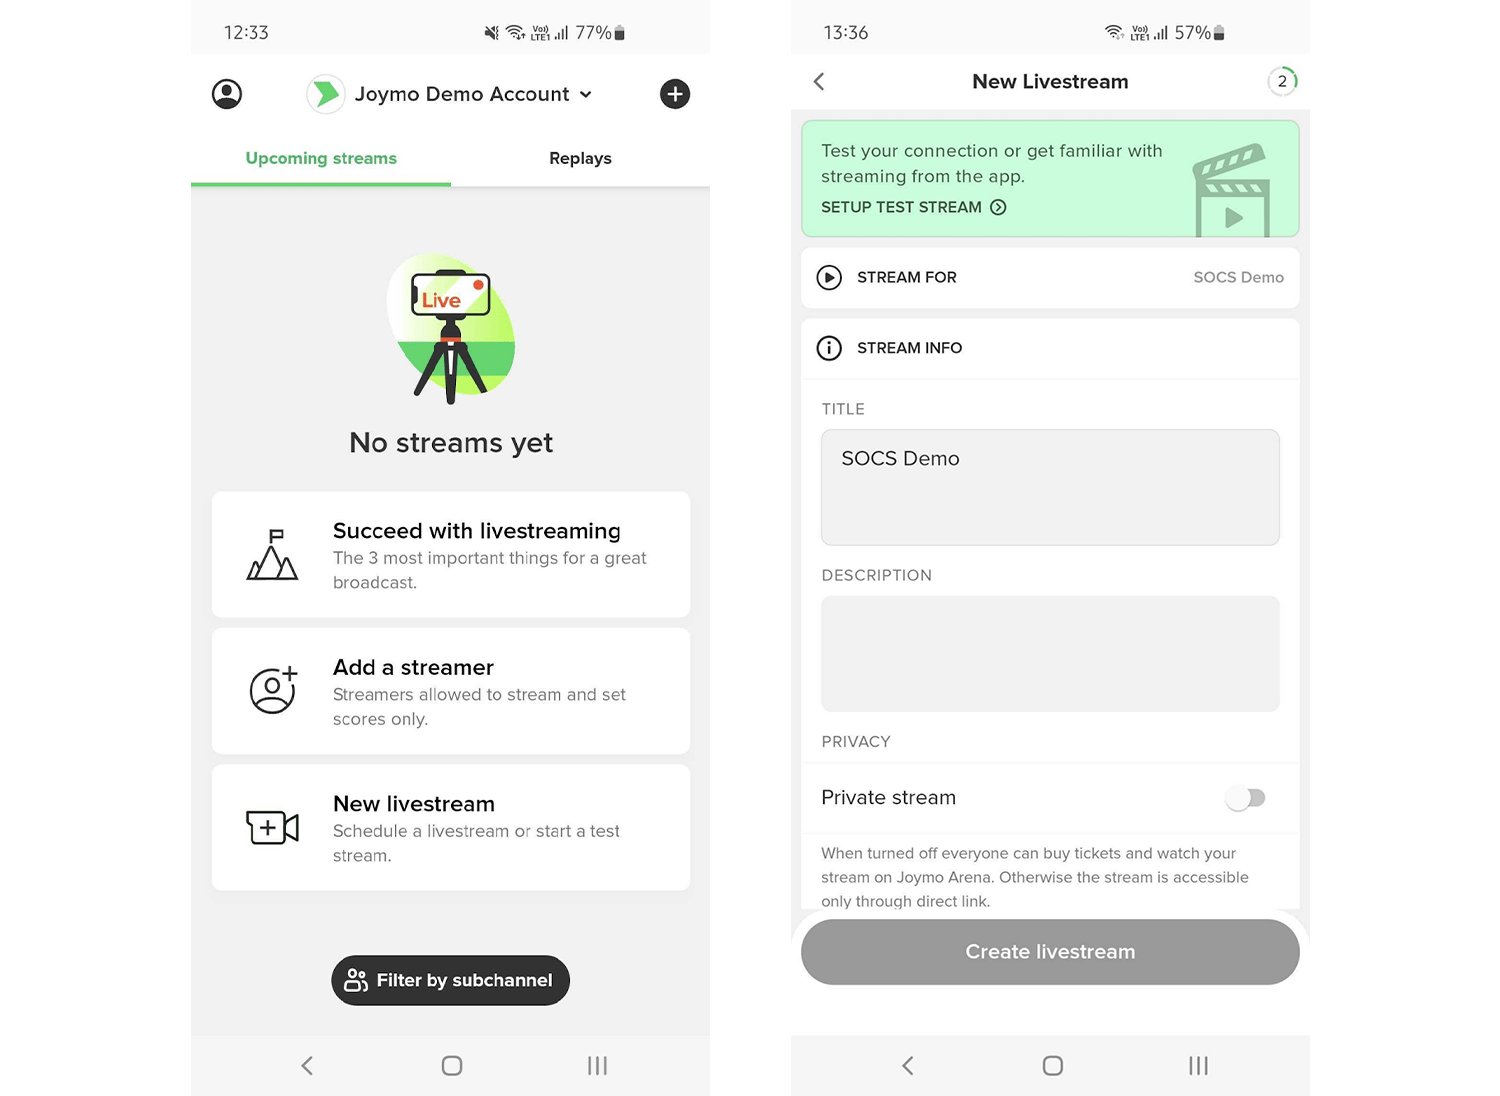
Stream For: Select the channel that you are scheduling a stream for. You will only see more than one channel if you are administering several channels.
Stream Info: For a test, this can be left with default text.
Streaming Method: Select if you are doing the test with Joymo Share (the app) External Camera (your own camera equipment and RTMP protocol)
Date and Time: Set the start time and date for your test.
Duration: Set the duration of the test. We recommend a longer test.
When all steps are completed, you go ahead and press "Create Livestream". The livestream will now be visible in the Joymo Share app.
When it is time to broadcast your event using the Joymo Share app, you open the app and select the event you are going to film.
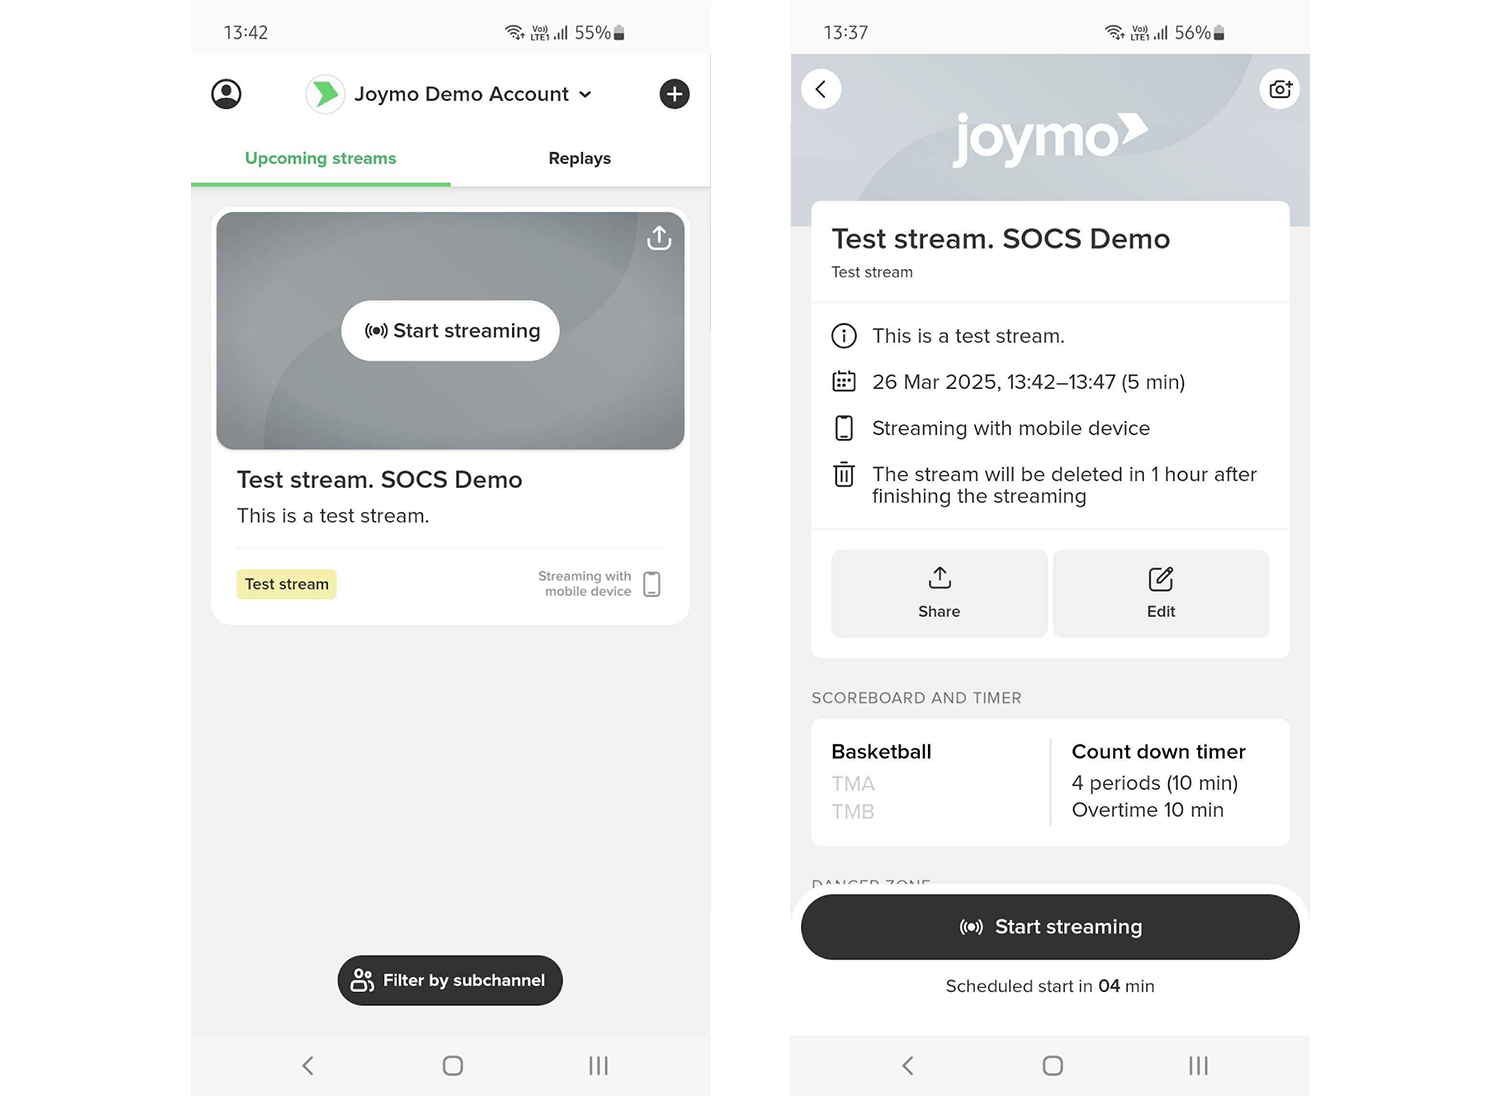
After selecting the event, the settings for the timer and scoreboard will become visible. You will also be able to share and edit your livestream, using the different buttons on the dashboard.
Scroll down on the page and you will see the section called Scoreboard and Timer. Entering this section will allow you to set up your scorekeeper settings.
Enable scoreboard and timer (if both are applicable for your sport).
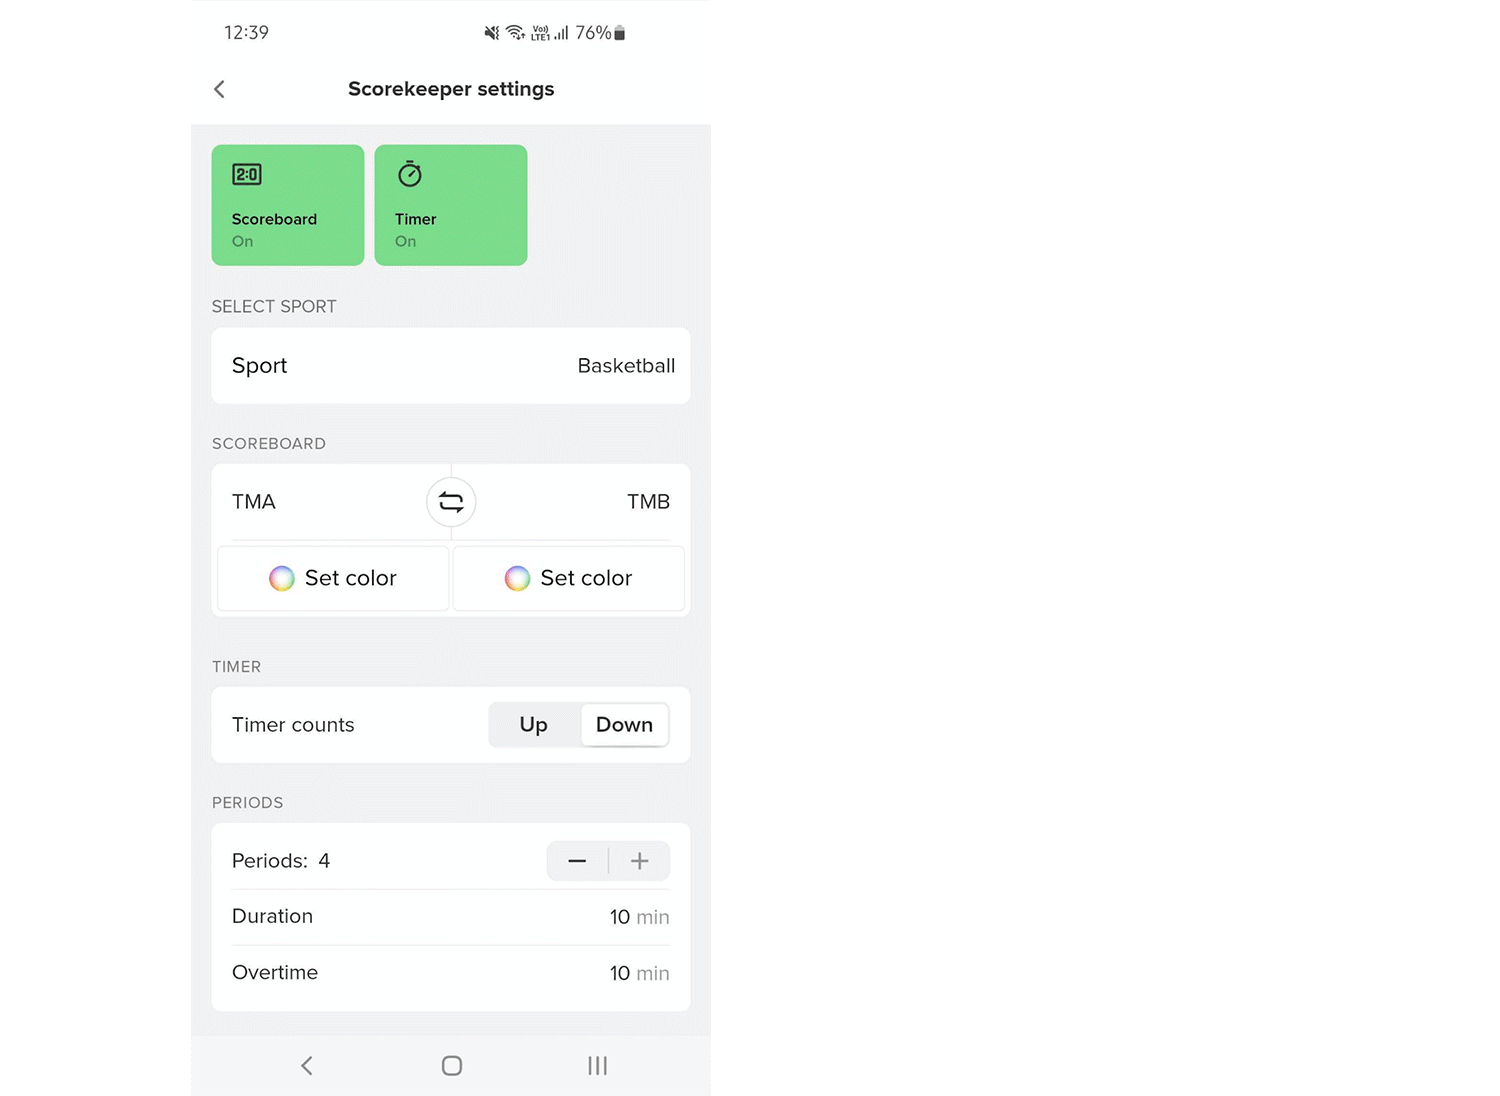
Once the steps are completed and you have set up the scoreboard, you go back to the front page and “Start Streaming”.
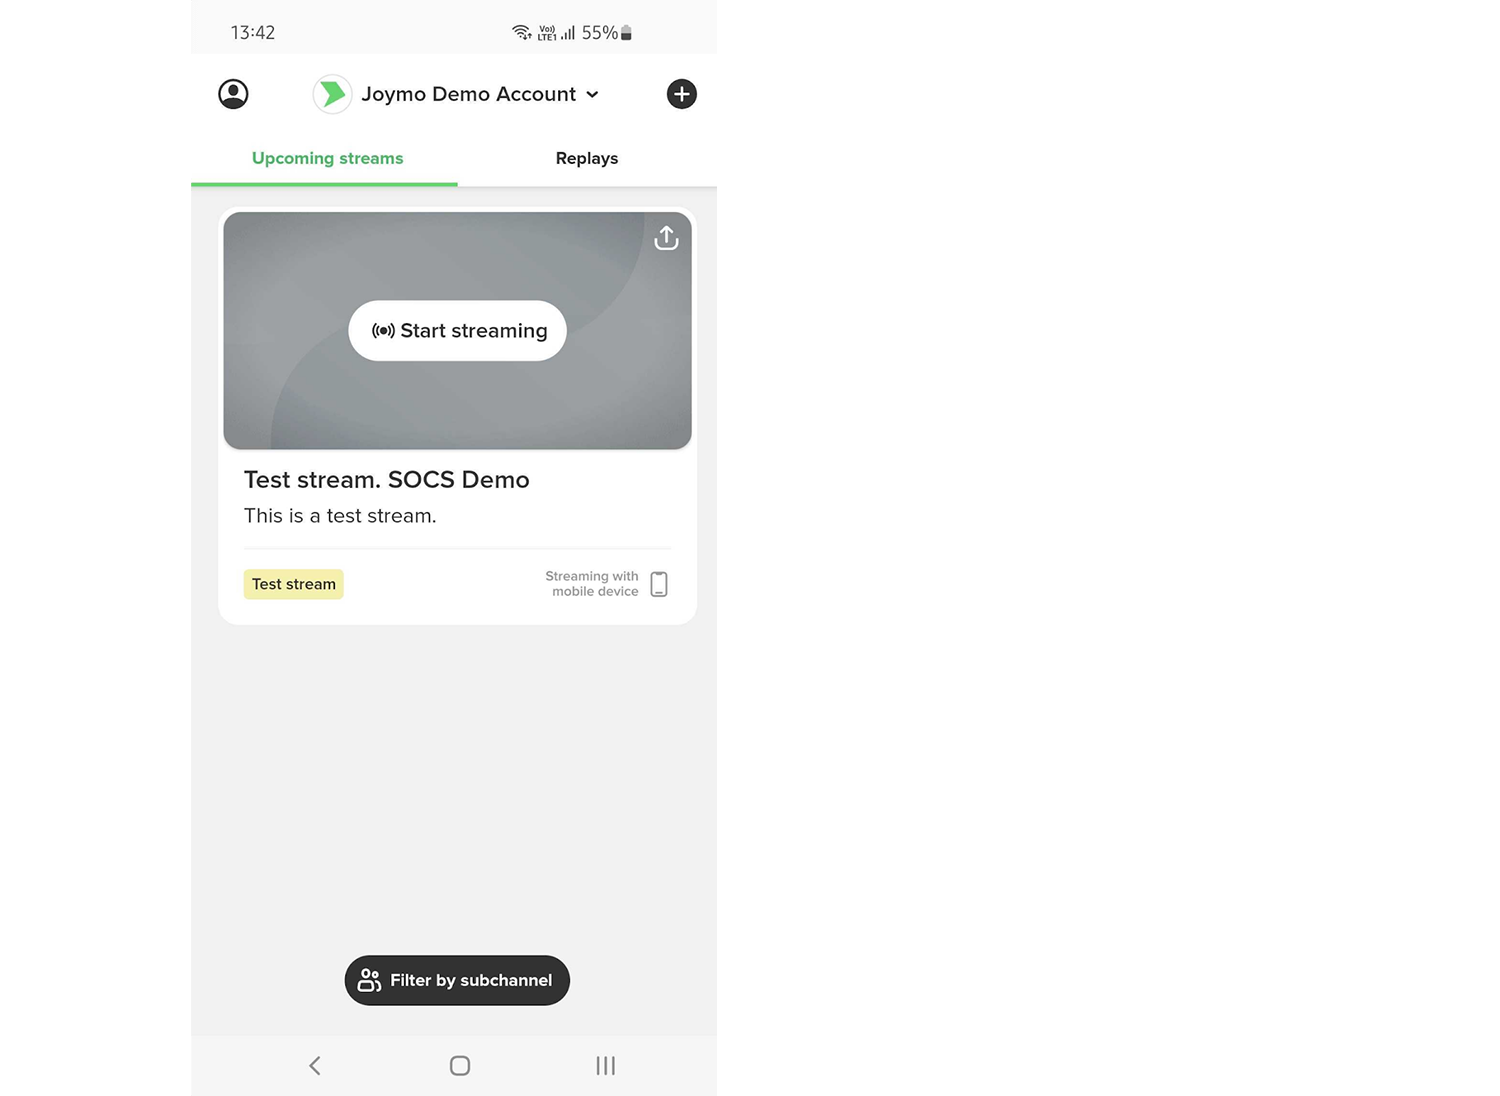
If you are streaming a lecture, school play, music performance or any other event where a scoreboard is not relevant, you just deselect the two icons on the top of the page in the Scoreboard and Timer setting. If they are grey (not green), it will mean they are not visible on the stream.
Once the steps are completed and you have set up or disabled the scoreboard, you go back to the front page and “Start Streaming”.

After entering the livestream, you will see this image. To start the filming, you have to press “Go live”.

From within the stream screen, you can also make changes to the scoreboard settings (or add scoreboard if this is not already visible).
You can also change the team names in the settings tab. Please note that the team names will always carry over from the previous broadcast. These must be changed ahead of the new event.

In the settings section, you can also End or Extend a broadcast.

If the start date and/or time of the event you are going to stream has changed, you can easily edit the time of the broadcast in the app. Select the event you want to edit, and click “Edit”. Make the necessary changes and save.
You can have a second user to assist with keeping the score and to manage the timer using a secondary device when broadcasting through the Joymo Share app.
The first user to access the event in the app will be the one having permission to manage the filming of the event.
Any other user (who is connected to the team account) who accesses the same event as User 2, will be able to join as a to scorekeeper.
The scorekeeper will not see the live feed, but will manage the timer and scoreboard on behalf of the user filming.
Should the user doing the filming lose access to the stream (in the event the device runs out of power, as an example), user 2 will have the option to take full control and to resume the filming.
